December 03, 2010

personal picture {clocks}

***Update: I was recently asked if you just keep the board the same size as the picture, and the answer is yes. :) Inevitably because of the cutting there will be a tiny bit of spacing you can see which is why we painted it, as well as to make the sides uniform as you don't want them to be brown mdf. Unless you do, than that's ok too. ;) Sorry, I would have emailed you the info, but there's no contact. :)

I was also asked how I got the numbers to be perfect on the board, I used a template of a clock online. Just google clock template. I put that in a layer on photoshop and marked with the paint tool where each number was, then I put my own in. 

I was asked too if I got the numbers at hobby lobby. I did not, just did it on the computer. You can buy little stickers at hobby lobby or joanns, just print out a template so its placed correctly.

Thanks so much for your questions! Please feel free to email me, I can't directly reply if your info isn't on the comment you leave. Thanks again to all! ***

Jonie from Just Between Friends and I had the opportunity to craft together, and since Jonie and I have been friends since college days, it was super fun to be able to sit down and craft with her! This post will also appear over on her blog, so check her out! We both write on this tutorial, so hopefully it all makes sense!

 
"Camilla and I FINALLY got together on a project we have been talking about for a little while now.  I was so excited to be able to join efforts with my seriously talented friend.  We both started our craft blogs about a month apart, and it has been really fun to have someone to chat with about my blog that is actually interested.  (My husband is really patient, but he can only take so much "blog talk" before he tunes out of the conversation. :) So after several conversations back and forth about the logistics of how to make it, I think we have come up with a project that is both elegant and totally do-able for anyone. 
 
 
Aren't you so excited?

 
What you need to get started:
1. Your favorite photo (or just one you really like)  I was fortunate to have photos that Camilla actually took for me as well as my sister's engagement photos that Camilla took as well. (I'm telling you....she is talented!)
2. Mod Podge
3. Paint that matches your photo, or a color that contrasts to add a definite border around the clock as well as covers the raw wood.
4. Clock parts (We went to the DI and Salvation Army and bought clocks and took them apart.  Good in theory, but some of them didn't work.  I suggest buying new ones. Camilla found a four pack at Hobby Lobby for $14.99 and used a 40% off coupon)
5. MDF board.  We used 1/8 inch MDF that was 2 feet by 4 four feet and only cost $2.63.  I had the Home Depot guys cut it down for me.  For this project, we made our clocks 16X16 inches, so we were able to cut three from one board.  We decided to buy two full boards so that we could make them as gifts but only had them cut to 12X12" (you can get 8 out of the board then).

Let's get started!
So this post will be a bit back and forth, so that was Jonie, and now this is Camilla. To edit the pictures I used photoshop CS4. I simply uploaded a picture file and pasted it into a 'new' image that was sized to 16x16 inches and 300 ppi. I also uploaded a template of a clock and used it as a pattern to make sure that I was placing my numbers or markers in the right places. I added some words to the image, and some brush strokes of florals for mine and Jonie's sister. I wanted to keep them pretty simple, but you can use textures if you want as well that also add some flare. Once it was how I wanted I flatened the image and then pasted it onto a 16x20 file size, because that is what Sams prints. Then I just cut the excess later with scissors. This can all be done on photoshop elements as well, and if you don't have photoshop, I hear Picnik.com is a great photo editing site. And if you just want to bag that all together, then I would reccomend just sending a favorite picture to Sams or Cosco (they will do a 12x12) and cropping it onto your board. Then you can use vinyl, stickers, or a stencil for the numbers and name. Some clock kits even come with numbers as well.

Back to Jonie! So after all of the prep work is done, you start by cutting your image to size and take a picture of your incredibly talented, cute and pregnant crafter in crime.  (Camilla: haah RIGHT.)
Then you will need to paint the edges of the board so that when the photo is on it there is no raw wood showing through.
After the paint is dry (very important step) completely cover the wood in mod podge and then attach the photo.  The best way to get rid of those bubbles without ruining your photo is to place something between your hand and the photo that won't stick.  We used parchment paper.
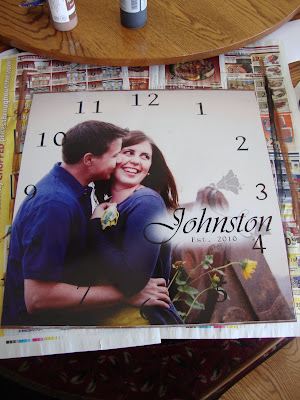
Once the mod podge is set, cover the top of the photo in mod podge.  It will look really scary, but it WILL dry clear....as long as you use mod podge and not paint.  if you use paint, then I can't promise anything.
 
Here are some more of the clocks that we did.  Camilla did some that were a simple subway art for her mom and mom in law.  I love the way they turned out too.


This one is going to take a little more work to finish it because of how dark it is, but I will show you in another post what I do to it. (Camilla: I'll be sure to link over to Jonie because I'M SURE it's gonna be awesome) :)
Let the mod podge dry and then it is time to drill holes for the clock parts to go through.  We measured from corner to corner on both side and marked the middle.  If you go both ways, there should be an X where the hole should go. 
 

Camilla: Also, the clock sets I bought included a hang up on the back which is super handy because the board is so light. You can also use a picture easel which is equally as cute.

Jonie: After the hole is drilled, put the clock together and take a good look at all your hard work.  I made this one for my sister who just got married Nov. 20th.


I love the end result and I think my sister will too.

So now that you know how to make it, go get started!  Christmas is in a couple of weeks!
And Camilla....Let's play again sometime!"

 
Camilla: TOTALLY AGREE :) Happy Crafting! Let us know what you think and if you have any questions!
We love comments! And Followers! Have a great weekend!

December 01, 2010

can't {wait}!

...to work on a project that involves this:

and this:

with my good friend Jonie from Just Between Friends.
It's gonna be so great!

November 29, 2010

nursery {furniture}

Photobucket
Does this picture not make you want to cry a little? In fear? Like it should be straight out of a horror movie? Ok, maybe a bit. I got this baby for $15 at the DI (Utah thrift store) when I was in college. It was great and completely cobweb free. Since my apartments were a little, well, ghetto, this dresser matched perfectly. I then moved to Washington DC so this little gem lived with my brother for awhile. When he moved it got stored under the deck at my parents. Where it was rained on. And snowed on. And inhabited by a small family of spiders. That grew into a large family of spiders. Poor dresser.
Photobucket
So fast forward a couple of years and I now live in a house with a great husband preparing a nursery for a little girl. I remembered the dresser and wondered if it had any potential as a changing table. I found it under the deck on a trip to my parents and saw that it was the PERFECT height for needed table and would give us a lot of great storage. So my dad pulled it into the shop, cleaned it up, rebuilt a drawer, tacked the back in, and built a top for it that was a bit wider than the original dresser. What a great dad. Then after some sanding and some white paint it made its way into the nursery.
Photobucket
Over the years some of the original hardware had gone missing so I bought four new 'girly' pieces for the top drawer for 50% off at Hobby Lobby and spray painted all the old hardware...because I'm cheap like that. I found a great toile pattern of vinyl at the dollar store that I put on the top and in all the drawers of the changing table and added a creme floral print panel to the gap in the back where the original dresser was shorter than the new top. It adds a great little place for storage now.
Photobucket
I also found some wood decorative pieces at Hobby Lobby to add a little feminine flare and help it match the following nightstand:
Photobucket
Isn't she beautiful? Hahahah. This is post sanding, so I didn't get a true before picture which I sincerely apologize for. I loved the scroll work at the bottom. Guess where I found it? On a curb. For free. Yea, that's right, free. I even knocked on the door of the house to make sure I wasn't stealing, but when no one answered I loaded it up by my pregoself and took it home. This was after passing it once, flipping a u turn and coming back. It also sat for a couple of months out in the rain. I'm really good with furniture like that.
Photobucket
After some sanding and some new/spray painted hardware, it's so cute and feminine! I love the two nursery pieces that cost me about $10 in paint and hardware to redo. (White paint I had on hand). I was going to antique them, which would also be a great look, but since the crib is not antique, I just went with a simple white. We did buy the crib new which I thought was a step up for us. :)
Photobucket
Happy Monday! Hope you had a marvelous thanksgiving weekend! I love comments! And followers! Both would totally make my day. :)

November 23, 2010

personalized {stockings}

Photobucket
I finally got around to making these as I've had this idea for a while now, and since there is a torrential blizzard outside right now I have no more excuses. I found the great muslin for 25% off at Joann's. I found the hounds tooth for $1.50 a yard at Walmart so I bought a bunch since I have other plans for it too. The tulle and felt I had on hand. Even though this was SUCH a simple project, my ocd kicked in after the first stocking, so I have yet to complete the other two. Also, do you know how weird it is to make a stocking for yourself as 'mom' when you never have been one up to this point? Yea. Weird.
Photobucket
The first thing I did was find a stocking in storage that my hubby and I had bought at the dollar store last year, cuz that's how we roll. Nice and cheap. I cut the muslin around the stocking just a little larger in order to allow for a seam.
Photobucket
I then used the muslin cutout as the pattern for the next two. I only needed three stockings, so I probably used about 1/2 yard on them. I did buy more muslin, because our family might *possibly* be bigger in the future.
Photobucket
The muslin stockings were about 8 inches wide, so I cut the hounds tooth into a strip about 4" by 15" long.
Photobucket
I put a basting stitch on both sides of the strip and gathered it loosely, then pinned it to the top of one side of the stocking.
Photobucket
I cut a small strip of tulle- about 20 inches long. When you sew the tulle will typically gather itself if your strip is only about an inch wide which mine was. I put that under the hounds tooth and then re pinned, because I was pretty much just making this up as I went along. All I knew was that I wanted muslin stockings, so...yea.
Photobucket
Sew your pieces down. Then pat yourself on the back. Then continue.
Photobucket
I cut a strip of felt about 9" long and 1" wide. I placed it over the seam and sewed lines into the felt so it would get that cute stitched look. At least that was the intention.
Photobucket
At first I was going to the back the exact same, but then I thought, "How cute would it be to do a pocket for notes from Santa on Christmas night?" See I don't need kids yet to still be a total five year old sometimes. It could also be a note from Mom and Dad if you've got some 'non-believers' in your home. ;)
Photobucket
I sewed a line across the top of the piece of felt I cut out then pinned the felt to the muslin.
Photobucket
I then stitched the other three sides with the machine.
Photobucket
I wanted to personalize the stockings so I attempted to make stencils from a font I liked on word. After I realized how dang long that would take that it would be better to just free hand cut them, I did so. I then pinned down the letters where they looked best on the stocking.
Photobucket
I stitched over each letter carefully and called it good.
Photobucket
Then at the top of each stocking side I folded it over and did a quick seam to finish them.
Photobucket
Then I put wrong sides together and sewed the two sides.
Photobucket
Trim any excess so that the sides are smooth when it's flipped.
Photobucket
I made a quick strip out of felt, looped it and then pinned it over the side seam.
Photobucket
Then I just sewed it down over the seam.
Photobucket
Flip it out and voila! You're done! I would have finished the other two, but I didn't. Apparently facebook was way more appealing than sewing. Don't worry, they'll be done shortly. Probably.
Photobucket
Note from Santa!
Photobucket
My parents used to leave us a 'note' by the cookie plate, I mean, SANTA used to leave us a note and we loved it as kids. How fun to have your own!
Photobucket
Happy sewing! Let me know if you have any questions, and if you like it! Have a wonderful Thanksgiving!

November 22, 2010

patchwork {frame}

Photobucket
On a past thrifting outing at the DI (Utah Thrift Store) I found this wonderful little frame. I seriously sat for five minutes because even though I knew what I would do with it and saw it's potential, it was still $4.00. And I am CHEAP. So about five minutes later, I sighed, put it back and walked away. Then about five minutes after that I picked it back up and went to the check out before I could change my mind. A little pathetic? Maybe. But c'mon, it was $4.00, not my typical $.35.
Photobucket
Although the digital roses were, well, what they were, I knew the old paper HAD to go. So I ripped it and scraped it off. Well tried anyway, some was pretty cemented down, so I just gave up. I cut four coordinating colors of scrapbook paper and measured where I wanted them to go on the frame. I cut them to size then modgepodged over the old paper and frame to the size of each paper at a time. Once they were all down I modgepodged over the top and added a thin ribbon between each paper line.
Photobucket

So now I have a cute little 'patchwork' frame for the nursery! Super easy and *mostly* cheap. ;) What do you think? Happy Monday!

November 19, 2010

dollar store {table runner}

Right now at Dollar Tree they have table runners that are 72" long for $1.00. (Of course they are a dollar, it's dollar tree). I found them in the thanksgiving shelf they made in order to make room for the mounds of Christmas items. I picked up a couple because I figured they could be the base of something cooler. I needed a runner for my coffee table which is only about three-four feet wide so the runner was too long. I cut a section out near the end of the runner (it was all folded up to sell so I just followed two fold seams for the cuts). Then I sewed the two pieces back together with 1/4 inch seam and pressed it down. I then took the section I cut out and cut the two surged sides of it, and zig zag stitched the other sides, so I had two pieces about 3 inches wide. I then placed them over the seam I had just made, and folded them how I liked, pinned and sewed. I put the other one on a fold line on the other side just so they matched. So here is a revamped dollar store table runner, which I still can't believe I only spent a dollar on. Huzzah.
Photobucket
Sorry no tutorial on this one, please comment if you have any questions or thoughts, but I promise, it's simple! And if it's not...there's probably no way on earth I could have done it. ;) Have a great weekend, see you Monday!

November 17, 2010

epic {fail}

Sometimes I get really awesome ideas. Around 1:00 in the morning. Usually it would be a pain getting ideas that early, but I get so excited I forget that logically most ideas that come at 1:00 just really aren't that good. I even made a tutorial on this idea. Then I got to the end. And chuckled. Then laughed a little because of the outright badness. And then I put it on the couch because I'm too lazy to make something else. And really, the ugly duckling now holds a place in my heart. And it's not too bad... just for sure makes it to the failometer. So here is the rosette pillow I so awesomely thought of at one in the morning. Who wouldn't think that toile, tulle, and burlap would make an awesome combo? I mean seriously.
Photobucket
I had some old pillows laying around. So I cut two squares out of toile about 1/2 inch bigger than my pillow form. I then sewed them together in preparation for putting in the pillow until I realized I needed to put the rosette on one side before I could do that. Commence un picking. And no, this isn't my first rodeo, I just have a seriously pregnant brain.
Photobucket
I started with a layer of tulle. It was leftover from the center pieces at my wedding, so it's a little sentimental, hence, I couldn't throw away 12 yards of red tulle. Sad, I know. To make the ruffle I cut a strip about 5" wide, folded it in half and then sewed the two edges with a basting stitch. Commence gathering. I like the word commence.
Photobucket
I also did that with the burlap, but no ruffling because the material was so thick. Instead I folded it into a octagonal shape (is that a word?) and pinned and sewed the edge. At this point I kind of liked it; it actually looked pretty cool.
Photobucket
This is where the epic fail sets in. I had a big hole I needed to fill in the middle that I thought the tulle would be great for. Wrong. You can see through tulle. Duh. I should have used the toile. It would have looked a lot better. But by the time I came to that conclusion I was way too 'I don't care' to turn back. So I sewed another ruffle in the middle. It didn't make it all the way, and I really didn't want to have to sew another layer of tulle. So I found some gray suede. I thought I love gray! I'm sure it will look good. Oh boy.
And here it is in its glory.
Photobucket
Photobucket
In the grand scheme of things its not too bad, but next time I'm whipping out more toile. You will also notice my living room has undergone another transformation, from this post which I think is here to stay, except for the addition of some creme pieces with the dark ones. I just sometimes have the habit of seeing a fabric I love and then thinking it should be all over my house when my style can be WAY too traditional for that. Yikes. I'd love to see if you make a rosette pillow using burlap! Message me your link! Happy Wednesday!
Related Posts Plugin for WordPress, Blogger...