***Update: I was recently asked if you just keep the board the same size as the picture, and the answer is yes. :) Inevitably because of the cutting there will be a tiny bit of spacing you can see which is why we painted it, as well as to make the sides uniform as you don't want them to be brown mdf. Unless you do, than that's ok too. ;) Sorry, I would have emailed you the info, but there's no contact. :)
I was also asked how I got the numbers to be perfect on the board, I used a template of a clock online. Just google clock template. I put that in a layer on photoshop and marked with the paint tool where each number was, then I put my own in.
I was asked too if I got the numbers at hobby lobby. I did not, just did it on the computer. You can buy little stickers at hobby lobby or joanns, just print out a template so its placed correctly.
Thanks so much for your questions! Please feel free to email me, I can't directly reply if your info isn't on the comment you leave. Thanks again to all! ***
Jonie from Just Between Friends and I had the opportunity to craft together, and since Jonie and I have been friends since college days, it was super fun to be able to sit down and craft with her! This post will also appear over on her blog, so check her out! We both write on this tutorial, so hopefully it all makes sense!
"Camilla and I FINALLY got together on a project we have been talking about for a little while now. I was so excited to be able to join efforts with my seriously talented friend. We both started our craft blogs about a month apart, and it has been really fun to have someone to chat with about my blog that is actually interested. (My husband is really patient, but he can only take so much "blog talk" before he tunes out of the conversation. :) So after several conversations back and forth about the logistics of how to make it, I think we have come up with a project that is both elegant and totally do-able for anyone.  Aren't you so excited?
What you need to get started: 1. Your favorite photo (or just one you really like) I was fortunate to have photos that Camilla actually took for me as well as my sister's engagement photos that Camilla took as well. (I'm telling you....she is talented!)
2. Mod Podge
3. Paint that matches your photo, or a color that contrasts to add a definite border around the clock as well as covers the raw wood.
4. Clock parts (We went to the DI and Salvation Army and bought clocks and took them apart. Good in theory, but some of them didn't work. I suggest buying new ones. Camilla found a four pack at Hobby Lobby for $14.99 and used a 40% off coupon)
5. MDF board. We used 1/8 inch MDF that was 2 feet by 4 four feet and only cost $2.63. I had the Home Depot guys cut it down for me. For this project, we made our clocks 16X16 inches, so we were able to cut three from one board. We decided to buy two full boards so that we could make them as gifts but only had them cut to 12X12" (you can get 8 out of the board then).
Let's get started!So this post will be a bit back and forth, so that was Jonie, and now this is Camilla. To edit the pictures I used photoshop CS4. I simply uploaded a picture file and pasted it into a 'new' image that was sized to 16x16 inches and 300 ppi. I also uploaded a template of a clock and used it as a pattern to make sure that I was placing my numbers or markers in the right places. I added some words to the image, and some brush strokes of florals for mine and Jonie's sister. I wanted to keep them pretty simple, but you can use textures if you want as well that also add some flare. Once it was how I wanted I flatened the image and then pasted it onto a 16x20 file size, because that is what Sams prints. Then I just cut the excess later with scissors. This can all be done on photoshop elements as well, and if you don't have photoshop, I hear Picnik.com is a great photo editing site. And if you just want to bag that all together, then I would reccomend just sending a favorite picture to Sams or Cosco (they will do a 12x12) and cropping it onto your board. Then you can use vinyl, stickers, or a stencil for the numbers and name. Some clock kits even come with numbers as well.
Back to Jonie! So after all of the prep work is done, you start by cutting your image to size and take a picture of your incredibly talented, cute and pregnant crafter in crime. (Camilla: haah RIGHT.) Then you will need to paint the edges of the board so that when the photo is on it there is no raw wood showing through.
 After the paint is dry (very important step) completely cover the wood in mod podge and then attach the photo. The best way to get rid of those bubbles without ruining your photo is to place something between your hand and the photo that won't stick. We used parchment paper.
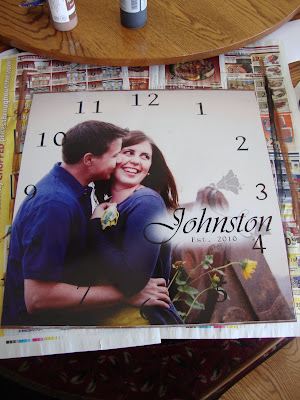 Once the mod podge is set, cover the top of the photo in mod podge. It will look really scary, but it WILL dry clear....as long as you use mod podge and not paint. if you use paint, then I can't promise anything. Here are some more of the clocks that we did. Camilla did some that were a simple subway art for her mom and mom in law. I love the way they turned out too.
 This one is going to take a little more work to finish it because of how dark it is, but I will show you in another post what I do to it. (Camilla: I'll be sure to link over to Jonie because I'M SURE it's gonna be awesome) :)
  Let the mod podge dry and then it is time to drill holes for the clock parts to go through. We measured from corner to corner on both side and marked the middle. If you go both ways, there should be an X where the hole should go.

Camilla: Also, the clock sets I bought included a hang up on the back which is super handy because the board is so light. You can also use a picture easel which is equally as cute.
Jonie: After the hole is drilled, put the clock together and take a good look at all your hard work. I made this one for my sister who just got married Nov. 20th.
 I love the end result and I think my sister will too.
 So now that you know how to make it, go get started! Christmas is in a couple of weeks!And Camilla....Let's play again sometime!"
Camilla: TOTALLY AGREE :) Happy Crafting! Let us know what you think and if you have any questions!  We love comments! And Followers! Have a great weekend!


