***Update: I was recently asked if you just keep the board the same size as the picture, and the answer is yes. :) Inevitably because of the cutting there will be a tiny bit of spacing you can see which is why we painted it, as well as to make the sides uniform as you don't want them to be brown mdf. Unless you do, than that's ok too. ;) Sorry, I would have emailed you the info, but there's no contact. :)
I was also asked how I got the numbers to be perfect on the board, I used a template of a clock online. Just google clock template. I put that in a layer on photoshop and marked with the paint tool where each number was, then I put my own in.
I was asked too if I got the numbers at hobby lobby. I did not, just did it on the computer. You can buy little stickers at hobby lobby or joanns, just print out a template so its placed correctly.
Thanks so much for your questions! Please feel free to email me, I can't directly reply if your info isn't on the comment you leave. Thanks again to all! ***
Jonie from Just Between Friends and I had the opportunity to craft together, and since Jonie and I have been friends since college days, it was super fun to be able to sit down and craft with her! This post will also appear over on her blog, so check her out! We both write on this tutorial, so hopefully it all makes sense!
"Camilla and I FINALLY got together on a project we have been talking about for a little while now. I was so excited to be able to join efforts with my seriously talented friend. We both started our craft blogs about a month apart, and it has been really fun to have someone to chat with about my blog that is actually interested. (My husband is really patient, but he can only take so much "blog talk" before he tunes out of the conversation. :) So after several conversations back and forth about the logistics of how to make it, I think we have come up with a project that is both elegant and totally do-able for anyone.  Aren't you so excited?
What you need to get started: 1. Your favorite photo (or just one you really like) I was fortunate to have photos that Camilla actually took for me as well as my sister's engagement photos that Camilla took as well. (I'm telling you....she is talented!)
2. Mod Podge
3. Paint that matches your photo, or a color that contrasts to add a definite border around the clock as well as covers the raw wood.
4. Clock parts (We went to the DI and Salvation Army and bought clocks and took them apart. Good in theory, but some of them didn't work. I suggest buying new ones. Camilla found a four pack at Hobby Lobby for $14.99 and used a 40% off coupon)
5. MDF board. We used 1/8 inch MDF that was 2 feet by 4 four feet and only cost $2.63. I had the Home Depot guys cut it down for me. For this project, we made our clocks 16X16 inches, so we were able to cut three from one board. We decided to buy two full boards so that we could make them as gifts but only had them cut to 12X12" (you can get 8 out of the board then).
Let's get started!So this post will be a bit back and forth, so that was Jonie, and now this is Camilla. To edit the pictures I used photoshop CS4. I simply uploaded a picture file and pasted it into a 'new' image that was sized to 16x16 inches and 300 ppi. I also uploaded a template of a clock and used it as a pattern to make sure that I was placing my numbers or markers in the right places. I added some words to the image, and some brush strokes of florals for mine and Jonie's sister. I wanted to keep them pretty simple, but you can use textures if you want as well that also add some flare. Once it was how I wanted I flatened the image and then pasted it onto a 16x20 file size, because that is what Sams prints. Then I just cut the excess later with scissors. This can all be done on photoshop elements as well, and if you don't have photoshop, I hear Picnik.com is a great photo editing site. And if you just want to bag that all together, then I would reccomend just sending a favorite picture to Sams or Cosco (they will do a 12x12) and cropping it onto your board. Then you can use vinyl, stickers, or a stencil for the numbers and name. Some clock kits even come with numbers as well.
Back to Jonie! So after all of the prep work is done, you start by cutting your image to size and take a picture of your incredibly talented, cute and pregnant crafter in crime. (Camilla: haah RIGHT.) Then you will need to paint the edges of the board so that when the photo is on it there is no raw wood showing through.
 After the paint is dry (very important step) completely cover the wood in mod podge and then attach the photo. The best way to get rid of those bubbles without ruining your photo is to place something between your hand and the photo that won't stick. We used parchment paper.
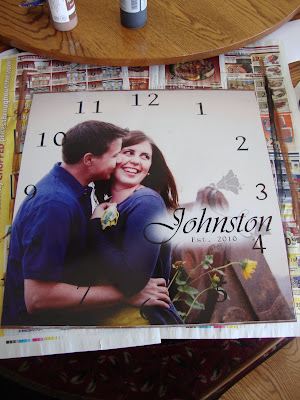 Once the mod podge is set, cover the top of the photo in mod podge. It will look really scary, but it WILL dry clear....as long as you use mod podge and not paint. if you use paint, then I can't promise anything. Here are some more of the clocks that we did. Camilla did some that were a simple subway art for her mom and mom in law. I love the way they turned out too.
 This one is going to take a little more work to finish it because of how dark it is, but I will show you in another post what I do to it. (Camilla: I'll be sure to link over to Jonie because I'M SURE it's gonna be awesome) :)
  Let the mod podge dry and then it is time to drill holes for the clock parts to go through. We measured from corner to corner on both side and marked the middle. If you go both ways, there should be an X where the hole should go.

Camilla: Also, the clock sets I bought included a hang up on the back which is super handy because the board is so light. You can also use a picture easel which is equally as cute.
Jonie: After the hole is drilled, put the clock together and take a good look at all your hard work. I made this one for my sister who just got married Nov. 20th.
 I love the end result and I think my sister will too.
 So now that you know how to make it, go get started! Christmas is in a couple of weeks!And Camilla....Let's play again sometime!"
Camilla: TOTALLY AGREE :) Happy Crafting! Let us know what you think and if you have any questions!  We love comments! And Followers! Have a great weekend!


45 comments:
This is super cute. Great for Christmas or a wedding. I am featuring this at somedaycrarfts.blogspot.com
This is amazing! Thanks for sharing! :)
Wow. Love this.
Oh my Garsh...I LOVE IT!! I sooo want to do this for presents!! Thanks for sharing!!!
HI
Wow, these look AMAZING!!
Thanks for the great tutorial.
Michelle :-)
Hi Again!
Thank you for linking up to Make It Monday this week.
Michelle :-)
Very nice. Great tutorial!
I am going to the store RIGHT NOW and getting some clock parts. I have just the picture for this!
That is so fun - what a great picture!
Found your blog through Someday Crafts, and I couldn't NOT comment! Awesome, can't wait to make this! Did you just photo shop the clock numbers onto the photo?
This is fantastic! I LOVE it!!
Way too cute!!!
I am totally in love with this and want to make them as Christmas gifts for my parents and in laws. Thanks so much for the tutorial and idea. So simple, yet sophisticated. Love it!
I love this! I wish I had seen this before bought all my Christmas presents. Where did you get the clock template?
What a fantastic idea (and great tutorial). Thanks for sharing.
Just had to come back and tell you I just finished 3 for each set of our parents for Christmas, now I just hope mr. postman can get them there on time! Love em!Thanks again :)
I can only find 3/8 in clock parts. Is that going to be a problem on the 1/8 in mdf board?
Hey Tiff!
So they are 3/8 inch wide? I don't think it will be a problem. The clock parts stick out a little in front on mine as well.
We love it! What size of photo did you use? How did you print the size of photo?
LOVE IT. I want to make like now but it's past midnight so I don't think I'll be doing that at this present moment lol, but soon :) Thank you for this tutorial! New follower.
dominiquescraftcouture.blogspot.com
awesome idea - i'm going to try my hand in making one too! :o) Thanks for sharing...
New Follower!!!
All the Best,
...M...
requirelife.blogspot.com
I ABSOLUTELY LOVE IT! Thanks for sharing :)
I adore this! what a fantastic idea. I'm your newest follower :)
I love this! I hear Christmas gifts calling...
what a fabulous idea the clock with personal pics in it. Great blog. So glad I happened on it.
I LOVE CRAFTS!!!
Smiley (Marlene)
www.books2blikehim.com
Oh, thank you, thank you, thank you, thank you!!! I have been making something very similar, using old, older, antique cabinet doors., and have SO been trying to find something less pricy, and a bit more simple, yet still look beautiful. Hopefully if they allow me to join, I can share some of my clocks with you! Thanks again, for showing me what was in my head, but would have been forever trapped... for sure!
Gratefully Yours,
Mart Scott
Why was modpdge use on top of the photo? I tried it out and it did not dry nicely It's all spotty. I have another one that I'm not putting modpdge on top of the photo because I don't want it to turn out the same way.
Hi Lindsay!
We used mod podge to protect the photo and to also give it a canvas look. When you mod podge the top, make sure the bottom part is completely dry from when you adhered it to the board, otherwise it will get bumpy. Also be sure to use enough modpodge on the top so that its not spotty, working from the edges over to the other edge. Good luck with the other one, let me know how it turns out! :)
Made one Saturday night for my mom's birthday. Thank you SO much for an awesome gift idea! I like it so much I'm going to make myself one with a different photo. Great tutorial! I blogged it here: http://paperwhitestudio.blogspot.com/2011/10/monday-morning-after-death-by-chocolate.html.
What a fantastic idea and tutorial! Thanks for sharing your amazing talent! And this proves that I can even make something for the guys on my list!!!!!
Could you please tell me how you got the template and the picture on the same sheet of paper??? I think you guys do really really great work. Hope I can do as good as you guys. But doubtful. Thanks
The vinyl numbers & letters, did you cut them or can that be found at like Hobby Lobby??
This is such a cool gift idea that I'm going to make one for my sister-in-law! I just have one question though. Is the picture supposed to be slightly smaller than the board? Is that what the paint for? Or can I just get a 12X12 board and 12X12 picture to put on it?
This may sound really silly...but how do you know you have placed the numbers perfectly? I have to do mine on picnik.com and place the numbers myself. I want the clock to work correctly so I wanted to know if there was a secret to placing the numbers exactly where they go and making sure the clock pieces that I buy works with it. Thanks!
Love!!!
Never would I have thought of this, it's simply marvelous. I'm off to make this now!
I am so grateful you shared this - it was even easier than I'd hoped, and made a wonderful birthday gift for my sister. I blogged about it here: http://homeownerbeth.blogspot.com/2012/01/making-time-matter.html.
Thank you for the inspiration and instructions!
Hello. I am curious as to how you put the numbers on in photoshop to know they were in the right place?
Hi, I am proud to say I'm your newest follower, Yay! Found this on Pinterest, and I LOVE IT! Such an awesome idea. Maybe this already got answered, but I'm wondering what MDF is??
I love this so much, can't wait to try it! I went looking for clock parts and there are so many different sizes.. 1/4", 3/4", 5/8", 1/2" and I'm not sure what those sizes refer to and which would be the best for this. Do you know which one I should get?
Thank you!
Me too. Mdf?? Like plywood?
Sorry stars/boulevards, I'm not quite sure what size or what those measurements are. I just got a six pack at Hobby Lobby like it says, they only had one option. It might be referring to the hole size, and that depends on your drill bit. And MDF is similar to plywood, its more like particle board. If you go to a home improvement store and ask for it and 1/8th of an inch, they'll lead you to it.
Made this just the other day, last step is to drill the hole and put in the clock pieces. Used Mdf board,the pictures had them printed at staples on 100lb paper, and then painted the with a black paint. Such a great idea, was so happy I found this.
Michelle: mdf is Medium-density fibreboard: an engineered wood product formed by breaking down hardwood or softwood residuals into wood fibres.
Thanks again for this great project, 2 thumbs up
I just have a quick question...did you use an actual photo paper picture or just a picture printed on normal computer paper?
Post a Comment